Impact Test
The notched bar impact test (ASTM E23, BS EN 10045, ISO 148-1, IS 1757, IS 1598) assesses the toughness and notch sensitivity of engineering materials. This test measures the energy required for a material to deform before fracturing, primarily evaluating the toughness of metals. It is also applicable to polymers, ceramics, and composites. Industries that benefit from this test include oil and gas, aerospace, power generation, automotive, and nuclear sectors.
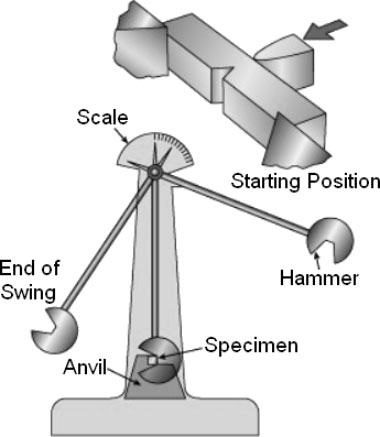
In the test, a notched specimen is struck by a heavy pendulum or hammer at a specified speed and distance. The energy absorbed by the fractured specimen is recorded, providing a measure of the material's toughness.
IZOD Test
- The test specimen, which can have one, two, or three notches, is machined with a square or round cross-section. It is positioned vertically on the anvil with the notch facing the hammer and securely fastened for testing.
Charpy Test
- The test specimen, featuring either a “V” or “U” notch, is machined to a full-size cross-section of 10mm x 10mm. When material thickness is limited, sub-size specimens are utilized. Samples can also be evaluated at cryogenic temperatures.

